Setting up a Dual-Monitor Projection System
Part I - Why Use Dual Monitors?
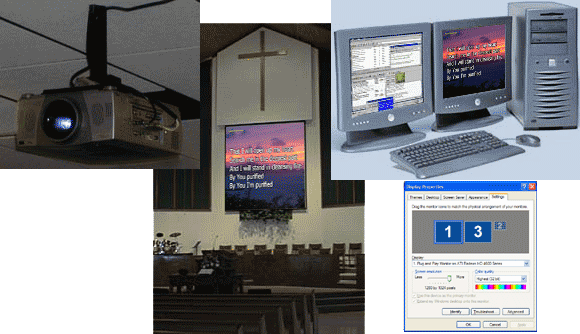
It's really not hard to get a Windows system set up for dual monitor use, but there are huge potential benefits to a projection system, especially with Worship LIVE! running the show. It's the perfect setup - it's like having one screen for the audiovisual team and one for the congregation. During a service, you can control the projected image privately - the congregation never has to see the work going on "behind the scenes." You don't need to constantly freeze and unfreeze the projector, and risk missing a freeze when you're in a hurry. During setup time, you can make changes and see how they affect the results without switching modes back and forth. And best of all, you'll be saving the life of that expensive projector bulb when you're just practicing.
When you're using the multiple monitor settings in Worship LIVE!, here's what your screen might look like.
(full size @ 576Kb) or (half size @ 173Kb)

(This is a full-screen shot of a Worship LIVE! playlist on a dual-monitor system, with
the Perform display showing a song on Monitor 2. Also open is the Customize Perform Format dialog.)
Dual monitor support throughout Worship LIVE! means that most windows remember their positions, regardless of which monitor they are on. And you can select which monitor carries the Perform display. As an added bonus, you can even force the Perform screen to be solid black when you're not using it (not even the mouse cursor shows up!).

Okay, so you're sold on the idea, right? Let's look at the details.
What it Takes
First, let's talk about cost. Let's start by assuming you already have a single monitor setup, with a projector. (If not, we'll give some pointers for getting started, on the next page.) You may even have the software you need already. At worst, you may need to upgrade Windows. If not, your total cost for adding a second screen can be as low as the cost of a single video card!Okay, that seems quite reasonable for these cool features. Why so cheap? Well, ever since Windows XP the software required to run multiple monitors is built into your Windows system. If you are running Windows XP Home Edition, you'll probably need to upgrade to WinXPPro. Beyond the Windows software, all you need is a second video card and monitor.
Getting it Installed
If you're running a relatively new laptop (less than a few years old), you probably already have dual-monitor capabilities. You just need to tell your laptop to use the extended desktop features - usually this is done by holding down a [Fn] key and hitting one of the top function keys to toggle between the various modes (single screen, cloned/mirrored displays, or extended displays). If you have a desktop PC, you will need to install the second video card. Grab that old Philips screwdriver, and find an open slot. We won't go into details, as any capable teenager or audiovisual engineer these days probably knows how to do this and would probably love the opportunity.If you're using a scrounged video card from another PC, make sure you have the latest drivers. If you can't find the install CD, contact the manufacturer for assistance (usually you can get them from the manufacturer's web site for free).
Now boot the PC up. One of the monitors will power up and show the boot process. If your drivers are sufficiently up to date (we'll get to that later), at some point in the boot process the second monitor will simply appear with your selected background.
During the boot process, Windows may ask for drivers for your new video card and/or the monitor. Be ready to insert the CD, or open some downloaded drivers, as appropriate. This is no different than if you were to upgrade your existing video card or monitor.
Setting Up Windows for Dual Screens
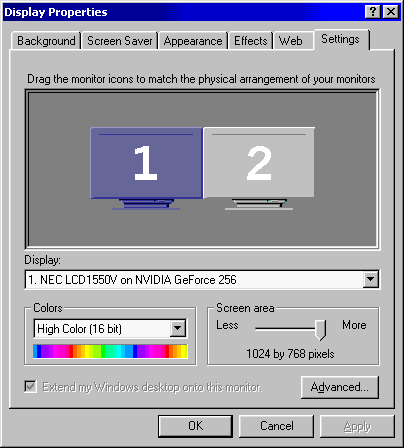
Once you've booted up, you'll need to tell Windows you want to use this new monitor as part of your desktop. At least Windows is smart enough to make the assumption that, yes, there's no other reason you would have bothered to install a second monitor unless you really did want to use it. Here's how to proceed.First, right-click anywhere on the desktop and select "Properties" from the popup menu. Or open the Display control panel. (Both actions bring up the same screen.) Then select the Settings tab.
In Windows XP, it looks something like this (actual details will vary for operating system and hardware specifics). (Click to enlarge)
In Windows 7, it will look something like this (click to enlarge):

Now click on the icon of the second monitor. You'll see the settings. If you haven't already used this monitor, Windows will ask you if you want to extend the desktop - select Yes.
The resolution and screen size are important. While you can set the second monitor to any screen size or resolution, we've found that you will get the best results if both monitors are running at the same number of colors.
You can rearrange the monitors' relative locations; just click the second monitor icon and drag it around with respect to the first one. After you apply the changes or click OK, you'll discover that Windows treats the second monitor as if it's in that actual physical location with respect to the primary monitor. For example, if you leave it in the default location (to the right of the primary monitor), when you move the mouse past the right edge of the first screen, it will show up on the left of the second screen. You can also position it above, or below, or anywhere else, as long as some portion shares an edge with the first (primary) monitor.
Potential pitfalls
Pay close attention to what kind of slot you have available in your PC. Don't buy the wrong kind of card - a PCI card won't work in a PCI-express slot, for example.Your second video card and drivers must be relatively recent. Any decent card with new drivers should work. Windows will not allow some older drivers or cards to work as a second monitor, and some may provide flaky results - missing mouse cursors, bars across the screen, etc. A decent quality, perfectly acceptable card can be purchased at any computer store for as low as $50.
Windows may select your NEW card as the primary monitor. There's not much you can do about this in most PCs. It's a function of which video card starts up first when you boot the computer. Some newer computers allow you to select in BIOS which monitor is used as Primary. Fortunately it's a fixed setting - whichever card shows up first will always show up first, unless you can select it in BIOS. If this does happen, simply swap the monitor cables on the back of your PC. It should have no real effect on the final outcome, unless you have a high-end video card with special features you need for the primary screen (such as hardware DVD playback, or special 3D acceleration). If that's the case, sometimes rearranging the order of the video cards in the slots can help - IF you can do that, of course.
Documents that overlap both monitors will scroll somewhat slowly. It takes Windows a lot more work to handle two monitors if a document or dialog box is split across the different monitors. While it will work, it will be slow. You may wish to keep your documents confined to only one screen at a time.
Other Possibilities
How about the connection between your PC and your projector? If you were running a single monitor system, you probably were using a video signal splitter to connect both your control monitor and the projector to the back of your single video card. You can still use that splitter to excellent advantage. Just hook it up to the back of your new second video card, send one output to the projector as before, and the other output to a second monitor on your audiovisual system desk. Now you can see exactly what the congregation sees - but much closer, and unaffected by the freeze or mute functions of your projector.Going further
In the next page (coming soon), we'll discuss possibilities for wiring your projection system to take best advantage of your setup. In particular, we'll focus on ways to make sure the congregation sees everything, even in those pesky alcoves, and how you can be sure everyone is seeing the same image. We'll also discuss possibilities for routing videotape, satellite or antenna television, and even second computer inputs through one single wire up to your projector, to help centralize your switching and control of the projection system.
Other Info
Why Dual Monitors?
Checklist